In this article, you can easily figure out how to create Manual partition in Ubuntu 18.04 LTS Desktop. If you are installing Ubuntu first time then you should follow this “Step by Step tutorial of installing Ubuntu 18.04 LTS Desktop“.
Table of Contents
Step 1: Selecting Manual partition scheme
So at the very first step as you know, we have to create a bootable DVD/USB media from which we can start our installation.
If you don’t know how to create a bootable DVD or USB drive then you should go through this article “Create Bootable DVD/USB for Ubuntu 18.04 LTS Desktop”.
After that, you have to boot from the bootable media which is either a DVD or USB. After a few other things in installation, you reach to the below screen when have to choose the partition scheme of our installation.
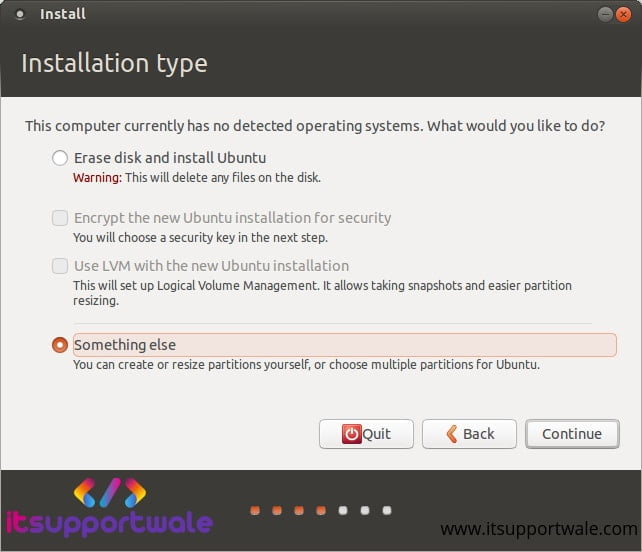
On the above screen, we have to select which type of partition scheme we want.
If you do not want to create manual partition the simply select the Erase disk and install ubuntu option. By this option, the installer automatically creates the necessary partitions.
But here we are creating a manual partition so we select the Something else option and click on continue.
Step 2: Selecting the Right DISK
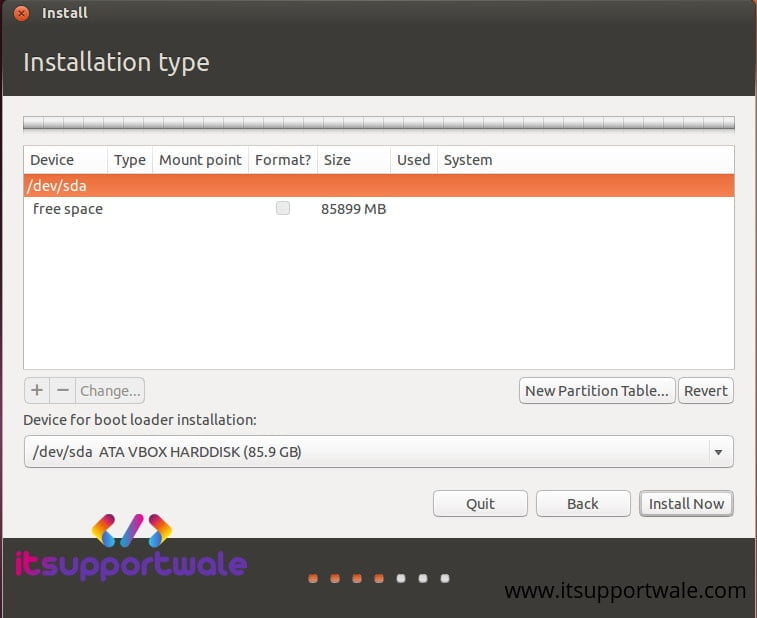
After selecting partition scheme you will see all the disks which are connected the to system.
you will see the drive names as /dev/
Step 3: Creating Swap Partition
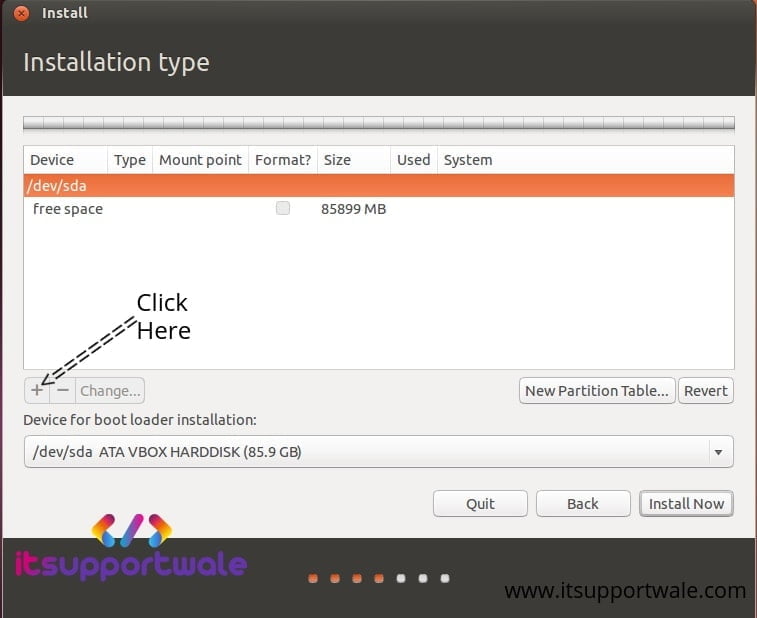
If you have a fresh empty hard disk then you have to first clean on New Partition Table after that select the free space and Click on + to create a new partition.
It is highly recommended that you create a Swap partition. Swap space is used as a Virtual Memory of the machine which is used to keep the temporary inactive memory pages.
If you want to read more about Swap Space that follow : “SwapFaq“.
Now Select the free space and create the swap partition by clicking on “+” as shown in the image below.
Now you will the below screen for selecting the type of partition and the size of the partition you need. Fill the details as per your needs and Select Use as swap area from the drop-down list as shown in the image.
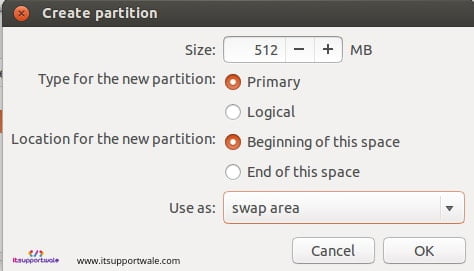
Also note that the recommended swap size is twice of your physical memory. For example if your RAM is 4GB than you should create a swap partition of 8GB.
Step 4: Creating ROOT partition
The root partition is used for keeping kernel files, boot files, system files and other system required files which are necessary for Operating System.
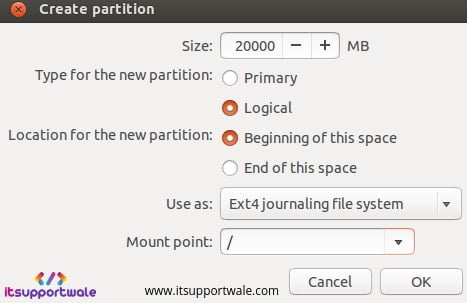
Recommended size for the root partition is 20 to 30 GB for smooth working of Operating System. If you are going to install a lot of software than you should increase the size according to your needs.
For creating the root partition select the free space and click on “+” sign. And after giving the size of the partition choose Use as Ext4 journaling system and select the mount point as “/” as show in image below.
Step 5: Creating other partitions
Other remaining partitions are optional and can be created using same procedure as describe above. Once you done all the partitioning just click on install.
Here we concluded the manual partitioning of Ubuntu 18.04 LTS Desktop. For further information on Ubuntu and other technologies follow us on Social Media. Happy Learning!!!
Also Read: How to create bootable USB disk in Ubuntu
Hello I was wondering if you still have to install a swap partition with the option “something else” because nowadays a swapfile is used in Ubuntu 18.04?
bruhh this setup won’t boot because you didn’t have an esp