In this article, you will learn the 3 most simple ways to create bootable USB using iso image in Ubuntu. Nearly all of the major Linux OS including Ubuntu are having some utility for creating bootable USB.
In this tutorial, We take the three most common tools for creating bootable USB. One of them is come pre-installed in most flavors of Ubuntu and the other two can be easily installed.
You will need these things.
Table of Contents
Requirements :
- A 2GB or larger USB drive
- Ubuntu Desktop installed
- An ISO file of Operating System.
Note: In this article, I will use ISO of Ubuntu 18.04 LTS Desktop. But you can use other any other Linux Distro. You can download the ISO of Ubuntu 18.04 LTS Desktop from here: https://www.ubuntu.com/download/desktop
So let’s begin the adventure…
1. Create Bootable USB using Startup Disk Creator
Startup disk creator is pre-installed in most of the Linux distributions including Ubuntu. It is very simple to use it,
Insert your USB disk and launch the Startup Disk Creator from Application Menu (This may be different according to your ubuntu flavor). You will see a popup window like the below image.
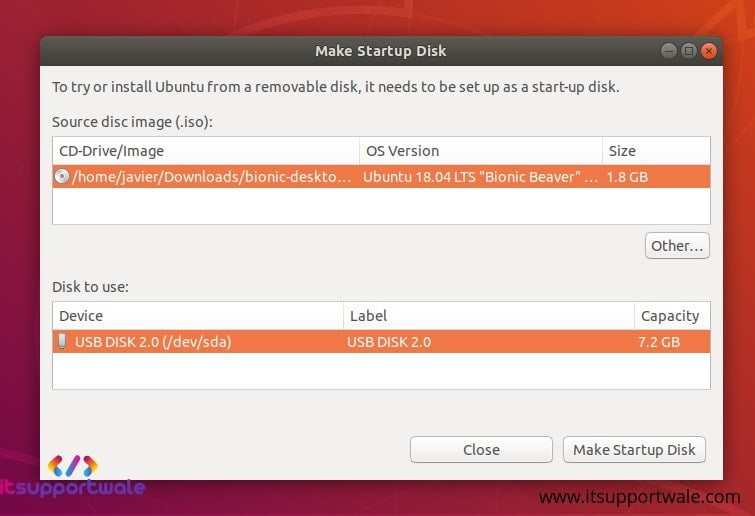
The simplest thing about this application is that here you will get only two options. The first is for selecting the ISO file and the other is for selecting the USB disk which we want to use.
So you have to just click on other option and select the ISO of the Operating System. You can see the list of available USB drives connected to your system.
Note: Please choose USB Disk carefully because data of the selected USB disk is erased entirely during the process.
Click on Make Startup Disk and confirm the selected USB disk. Yeah, that’s it Your bootable USB disk is ready in few minutes. You will get a popup of Installation Complete surely.
2. Create Bootable USB using UNetbootin
UNetbootin does not come pre-installed in Ubuntu but You can install it via Ubuntu Software Center or using the Terminal. Terminal installation is recommended for the latest version so Let me show you how to install it.
If you want to install it via Ubuntu Software Center than just open it and search for UNetbootin and click on install.
But for the Terminal Installation you have to run these commands in a terminal :
sudo add-apt-repository ppa:gezakovacs/ppa
sudo apt-get update
sudo apt-get install unetbootin
Now you have successfully installed UNetbootin. When you open it you will get Two methods Distribution and DiskImage, for making a bootable USB disk.
The distribution option is for those people who don’t have the ISO file of the Operating System and also don’t want to download it.
Using this option all the required files for the selected OS are downloaded by UNetbootin but Remember this method requires an internet connection.
You have to select the distribution and also the version of the distribution.
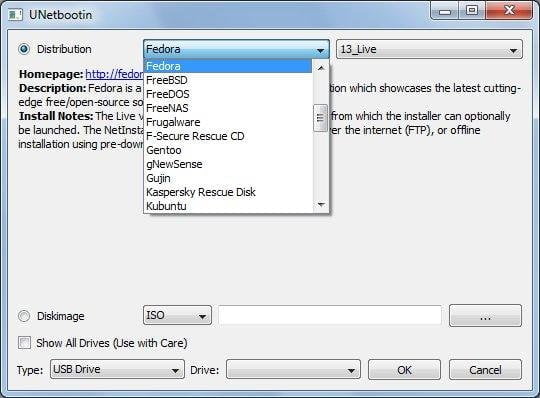
The second method is the DiskImage. In this method, we use the ISO image of the Operating System which we download from the official website of the distribution.
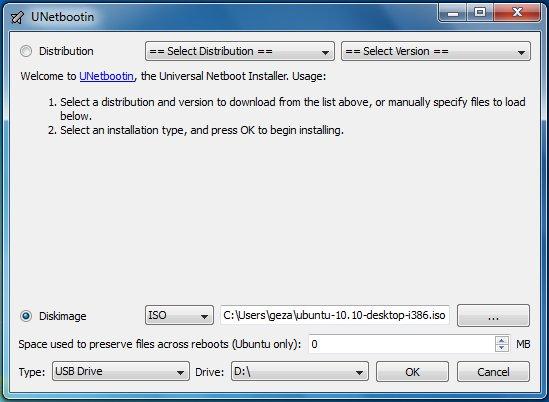
After that, Select the USB drive then hit the OK button to begin the process. Again choose the USB disk carefully because USB disk is being formated during this process.
3. Cloning ISO image to a USB disk using Ddrescue
In Linux distribution, we all love the terminal interface for installing and updating software because terminals are fast and accurate. That’s why we choose this command line tool for the third one on this article.
Basically, Ddrescue is a Data Recovery Tool which can copy data from any device to another. But we using it for Cloning the ISO image to our USB disk.
Again, Ddrescue does not come pre-installed in Ubuntu so we have to install it via Terminal so run these commands in a terminal :
sudo apt update
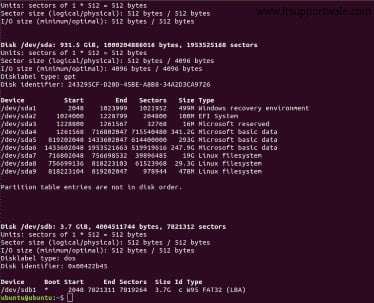
sudo apt install gddrescueAfter Ddrescue installed. For using Ddrescue we need to know the exact name of our USB disk in our system which is also called a block device name (something like dev/sd..). To find the exact name run this command in terminal:
sudo fdisk -lBy this, you get the list of connected disks on your system. Identify your USB disk carefully because choosing the wrong disk can destroy or damage your data. Here the USB disk name is dev/
After you get the exact block device name of the USB disk. Run this command in terminal to start the process:
ddrescue path/to/image.iso /dev/sdx --force -DIn the above command replace the path/to/image.iso with the actual path of the ISO file and also replace the /dev/sdx with your actual Block device name.
When the process is finished the bootable USB disk is ready.
Bootable USB in Ubuntu
In this article, we concluded 3 simplest ways to make a bootable USB in Ubuntu. However, there are many other tools are available to do the same task in different ways.
Use the comments section for your suggestions if something is missing in this article. Happy Learning ..!
Also Read: How to install Ubuntu 18.04 LTS Desktop