Current Stable Release of PHP is 7.4.1 released on 18 December 2019. In this article, we learn how to install the latest PHP 7.4 in Ubuntu Server. PHP 7.4.1 is available for production environments and you can install it via the Ondrej PPA repository. However, you can install the older versions of PHP using this repository including versions 7.2 and 7.3.
PHP is one of the most used programming languages on the internet. Make sure you get the latest version installed for security and bug fixes. You can check here, what are the latest security vulnerabilities in PHP.
PHP is a very popular Server Side Scripting Language best known for interactive web pages and dynamic websites. We will learn the installation of PHP 7.4 in some simple steps. Just follow the below steps for installing PHP 7.4 on Ubuntu Server.
Table of Contents
Step 1: Add Ondrej PHP PPA Repository
All the Ubuntu supported PHP build packages are present in ppa:ondrej/php PPA repository. You can add it by using the below command.
sudo apt -y install software-properties-common
sudo add-apt-repository ppa:ondrej/php
sudo apt-get update
Step 2: Install the latest PHP version in Ubuntu 18.04
The Ondrej PPA repository is having all the supported PHP packages for ubuntu. So that you can install any version of PHP using this repository.
You can also see the available versions of PHP by using the below command.
sudo apt list | grep phpBut in the article, we install the latest PHP 7.4 by using the below command.
sudo apt-get -y install php7.4After that, You get the latest PHP 7.4 installed in Ubuntu Server. To see the version of installed PHP, use the below command.
php -vYou will see the output as below
root@linuxbots:~# php -v
 PHP 7.4.1 (cli) (built: Dec 18 2019 14:44:04) ( NTS )
 Copyright (c) The PHP Group
 Zend Engine v3.4.0, Copyright (c) Zend Technologies
     with Zend OPcache v7.4.1, Copyright (c), by Zend Technologies
After that, you can install the additional packages of PHP by using the below command.
sudo apt-get install php7.4-xxxReplace xxx with the package name. For example, if you want to install the PHP JSON package then you should run the following command.
sudo apt-get -y install php7.4-jsonOr you can install multiple packages with a single command like below.
sudo apt-get install -y php7.4-{mysql,mbstring,json,gd,bz2,bcmath}All the PHP related configuration of apache server will exist in /etc/php/7.4/apache2/php.ini
Installing the PHP 7.4 with Nginx
Installing the PHP 7.4 with Apache Webserver
If you are willing to install PHP with Apache Web Server, then you have to install the PHP module for apache. Install the PHP module for Apache using the below command.
sudo apt install php libapache2-mod-phpAfter installation, restart the Apache webserver by using the below command.
sudo systemctl restart apache2Installing the PHP 7.4 with Nginx
The default installation of PHP is configured for the Apache Web Server. If you want to install the PHP 7.4 with Nginx, you have to stop and disable the service of Apache Web Server. You can do it by below command.
sudo systemctl disable --now apache2Now we install PHP-FPM with Nginx. By running below command.
sudo apt-get -y install php7.4-fpm nginxNow start and enable the PHP-FPM and Nginx services By running below command.
systemctl start php7.4-fpm
systemctl start nginx
systemctl enable php7.4-fpm
systemctl enable nginx
You can verify that both services are running by using the below command.
systemctl status php7.4-fpm
systemctl status nginx
All the PHP related configuration is present in /etc/php/7.4/fpm/pool.d/www.conf
Step 3: Verify PHP installation
To verify the successful installation of PHP in our Ubuntu 18.04, We just create a new file in our server’s root directory which is by default /var/www/html/. We create a PHP file with any name, For this tutorial we create the file with the name test.php and enter the following PHP code in that file.
<?php

// Show all information, defaults to INFO_ALL
phpinfo();

?>
After that, save the file and point your browser to that file Using this URL http://mydoman/test.php Here replace the mydomain by your domain name or IP address.
You will the page like the below image.
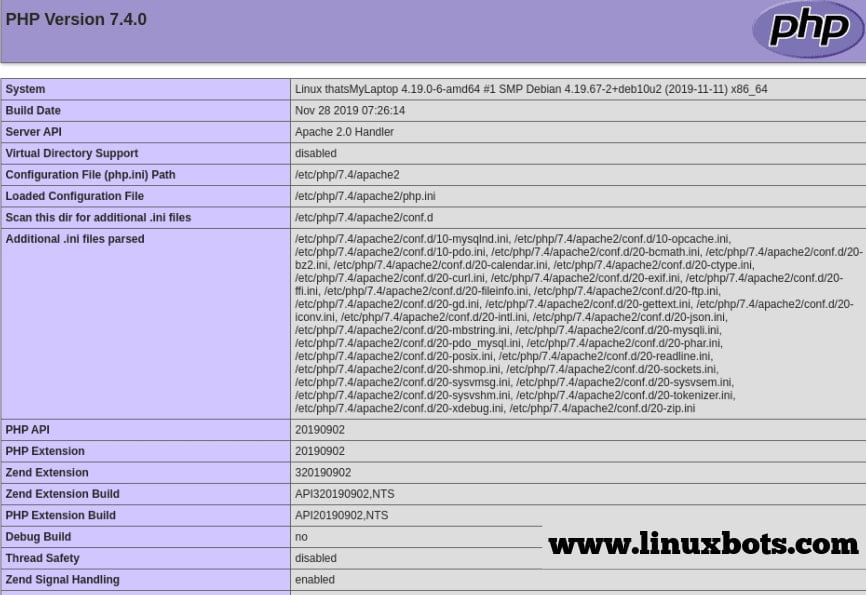
That’s it, you have the latest stable PHP 7.4 install and running now.
Install PHP 7.3 in Ubuntu 18.04
If you want to install the older version of PHP. Just follow the below steps to install PHP 7.3 in Ubuntu 18.04.
- Enable the Ondrej PHP repository:
sudo apt -y install software-properties-common
sudo add-apt-repository ppa:ondrej/php
sudo apt-get update- Install PHP 7.3 along with some common extensions.
sudo apt-get install -y php7.3 php7.3-{mysql,mbstring,json,gd,bz2,bcmath}- Verify the installation using the below command
php -vInstall PHP 7.2 in Ubuntu 18.04
PHP 7.2 is the default version of PHP which comes with Ubuntu 18.04 LTS. We do not need to enable the Ondrej PHP repository for installing PHP 7.2.
- Install PHP 7.2 along with some common extensions.
sudo apt-get install -y php7.2 php7.2-{mysql,mbstring,json,gd,bz2,bcmath}- Verify the installation using the below command
php -vConclusion:
In the article, we learned how to install PHP in Ubuntu 18.04. If you face any problem in following this article then you can mention it in the comment section.
Also Read: How To Install OpenLiteSpeed Web Server on Ubuntu 16.04 LTS
Dude, ondrej repo doesn’t support 18.04 anymore, don’t copy articles without checking them…
Hi Filip, Please visit this link for details. https://launchpad.net/~ondrej/+archive/ubuntu/php-qa?field.series_filter=bionic