Netplan, the new interface configuration utility in Ubuntu introduced in Ubuntu 17.10. For configuring static IP in Ubuntu 18.04 we will use Netplan. In the same vein, all the latest versions of Ubuntu Server and Desktop uses Netplan to manage and configure network settings.
Netplan reads network configuration from /etc/netplan/*.yaml. YAML is a commonly used human-readable programming language used for configuration files. Netplan currently works with NetworkManager and Systemd-networkd as supported renderers. NetworkManager commonly used for Desktop and Systemd-networkd used for Server. However, we can make a choice between them.
- Also Read: How To Install PHP 7.4 on Ubuntu Server
Here at LinuxBots, we try to make your work as simple as we can. That’s why we do most of the work in simple and easy steps. So if you do not want to read the full article, here is the short how-to of configuring static IP address in Ubuntu 18.04 using the Netplan utility.
Time needed: 5 minutes.
Configure Static IP in Ubuntu 18.04 using Netplan Utility
- List all available network interfaces
ip -a - Find the Netplan Configuration file in /etc/netplan
ls /etc/netplan - Generate the configuration if not found
sudo netplan generate - Edit the Netplan configuration
enp0s3:
 dhcp4: no
 dhcp6: no
 addresses: [172.16.8.220/24, ]
 gateway4:  172.16.0.1
 nameservers:
addresses: [8.8.8.8, 8.8.4.4] - Save and apply changes
netplan apply - Verify changes by list all interfaces
ip -a
Table of Contents
Prerequisite:
During this tutorial, Privileged access to Ubuntu 18.04 will be required.
List available network interfaces on Ubuntu
Above all, we have to find the available network interfaces on our system. You can list all the network interfaces by using the below command.
ip -a
As a result, we have two network interfaces available in our system. One is Ethernet and the other one is the loopback interface. We will configure static IP for the enp0s3 ethernet interface. However, it’s currently using DHCP for IP address.
Configure Netplan Static IP
The default configuration file was generated during installation which has DHCP as the default method for IP address. Look for a .yaml file in the /etc/netplan directory by the below command.
ls /etc/netplan/Output:
root@linuxbots:~# ls /etc/netplan/
50-cloud-init.yamlImportant: If you did not find the YAML file in /etc/netplan than you can generate it by the below command.
sudo netplan generateBy default, you can find content like below in the configuration file.
root@linuxbots:~# cat /etc/netplan/50-cloud-init.yaml
 This file is generated from information provided by
 the datasource.  Changes to it will not persist across an instance.
 To disable cloud-init's network configuration capabilities, write a file
 /etc/cloud/cloud.cfg.d/99-disable-network-config.cfg with the following:
 network: {config: disabled}
 network:
     ethernets:
         enp0s3:
             addresses: []
             dhcp4: true
     version: 2
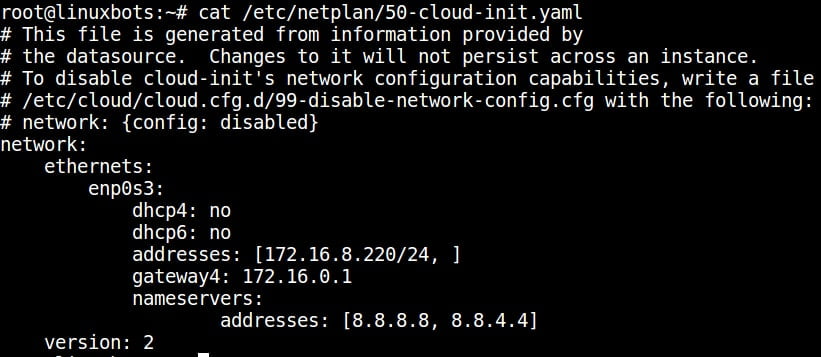
In the above output, the DHCP method is set for interface enp0s3. So now, for Setting up Static IP Address for interface enp0s3 edit the configuration file and put the details like below.
vim /etc/netplan/50-cloud-init.yamlenp0s3:
dhcp4: no
dhcp6: no
addresses: [172.16.8.220/24, ]
gateway4: 172.16.0.1
nameservers:
addresses: [8.8.8.8, 8.8.4.4]Here:
- enp0s3 – Name of the network interface
- dhcp4 and dhcp6 – DHCP method selection for IPV4 and IPV6
- addresses: IP address which we want to configure for interface
- gateway4: IPV4 address for the default gateway
- nameservers: list of nameservers uses for DNS resolution
After that, your configuration file will look like the below image.

After that, Save the configuration file.
Apply the changes we made in the previous step by using the below command.
sudo netplan applyAfter that, verify that the network interface is using static IP by list all network interfaces.
ip aOUTPUT:
root@linuxbots:~# ip a
1: lo: mtu 65536 qdisc noqueue state UNKNOWN group default qlen 1000
link/loopback 00:00:00:00:00:00 brd 00:00:00:00:00:00
inet 127.0.0.1/8 scope host lo
valid_lft forever preferred_lft forever
inet6 ::1/128 scope host
valid_lft forever preferred_lft forever
2: enp0s3: mtu 1500 qdisc fq_codel state UP group default qlen 1000
link/ether 08:00:27:3b:ae:03 brd ff:ff:ff:ff:ff:ff
inet 172.16.8.220/24 brd 172.16.8.255 scope global enp0s3
valid_lft forever preferred_lft forever
inet6 fe80::a00:27ff:fe3b:ae03/64 scope link
valid_lft forever preferred_lft foreverConfigure Netplan Dynamic IP
Similarly, to configure a Dynamic IP address for the same network interface simply use the below configuration.
enp0s3:
dhcp4: yes
Save the config and apply it by the below command.
sudo netplan applyafter that, verify the changes by listing all the interfaces by the below command.
ip -aThat’s it, now your system will get the IP by DHCP method.
Conclusion:
In conclusion, we have successfully configured static IP using Netplan in Ubuntu. We also covered how to configure dynamic IP using Netplan. You share your views in the comment section.