pssh ( Parallel SSH Program ) is a program for executing SSH in parallel on a number of hosts. It provides features such as sending input to all of the processes, passing a password to ssh, saving the output to files, and timing out.

We all nearly use the same “OpenSSH” for all our SSH needs. But we can not run the same command on multiple Linux systems with OpenSSH.
In this article, we will learn how to run the same command on multiple Linux systems using SSH and a single terminal.
Table of Contents
Why we need this
Suppose you are a System Administrator in a company and you have to manage several 100 Linux Systems. Now your boss wants to check how many systems are up and running. For a single system, we just fire up the terminal and run the command – “uptime” and it shows the current status of the system. Isn’t it very simple? But you have to go to every single system and run the command manually or you can do SSH every system one by one. Yeah!! Now, that sounds a little bulky work, not the smart work obviously.
So for this kind of scenario, we can use “PSSH” ( Parallel SSH Program ). As its name says, we can run SSH commands parallel on multiple systems.
How to Install PSSH or Parallel SSH Program
In this section, we will learn how to install the latest version of PSSH on CentOS/RedHat and Ubuntu/Mint using pip command.
pip is the package installer for Python. You can use pip to install packages from the Python Package Index and other indexes.
On CentOS and RedHat
On CentOS/RHEL distributions, you need to first install pip package under your system, in order to install the PSSH program.
yum install python-pipAfter installing pip tool, you can now install the pssh package with the help of command as shown below.
pip install psshOn Ubuntu and Mint
Again, You have to first install the pip package in Ubuntu or Mint Distribution.
sudo apt-get install python-pipAfter that install the Pssh program with this command.
sudo pip install psshHow to Use PSSH?
Using pssh is a piece of cake for you. Believe me!! At first, you have to create a file which is having the username, IP address and port number of all the systems you want to connect.
Example Host file content:
172.16.9.1
[email protected]
[email protected]:22
After that, we just have to run the command. But before that let’s have a look at available options that we are going to use in our command.
- -h host_file OR –hosts host_file: This option is used for importing the host file which we had created in the previous step.
- -l user OR –user user: This option is used for giving a common username for all the host if we do not specify the username in the host file.
- -A OR –askpass: This option is prompt for a password and pass it to ssh.
- -i OR –inline: This option will display standard output and standard error as each host completes.
- -O options OR –options options: This option is used for giving SSH options in the format used in the SSH configuration file.
So, now we have covered at least those options which are necessary for the initial use of pssh tool.
Lets see some example of pssh command for better understanding:
- For example, you want to see the mac address of all the hosts which exist in our host file. So you can do this via this command:
pssh -O StrictHostKeyChecking=no -h hostfile -l admin -A -i "ifconfig"[1] 11:57:55 [SUCCESS] 172.16.9.0
eth0 Link encap:Ethernet HWaddr 00:21:85:ad:ff:b3
inet addr:172.16.9.0 Bcast:172.16.255.255 Mask:255.255.0.0
inet6 addr: fe80::221:85ff:fead:ffb3/64 Scope:Link
UP BROADCAST RUNNING MULTICAST MTU:1500 Metric:1
RX packets:131561 errors:0 dropped:0 overruns:0 frame:0
TX packets:52324 errors:0 dropped:0 overruns:0 carrier:0
collisions:0 txqueuelen:1000
RX bytes:28848457 (28.8 MB) TX bytes:6277146 (6.2 MB)
Interrupt:17
lo Link encap:Local Loopback
inet addr:127.0.0.1 Mask:255.0.0.0
inet6 addr: ::1/128 Scope:Host
UP LOOPBACK RUNNING MTU:16436 Metric:1
RX packets:838 errors:0 dropped:0 overruns:0 frame:0
TX packets:838 errors:0 dropped:0 overruns:0 carrier:0
collisions:0 txqueuelen:0
RX bytes:70853 (70.8 KB) TX bytes:70853 (70.8 KB)
[2] 11:57:55 [SUCCESS] 172.16.9.1
eth3 Link encap:Ethernet HWaddr 78:45:c4:07:05:89
inet addr:172.16.9.1 Bcast:172.16.255.255 Mask:255.255.0.0
inet6 addr: fe80::7a45:c4ff:fe07:589/64 Scope:Link
UP BROADCAST RUNNING MULTICAST MTU:1500 Metric:1
RX packets:182880 errors:0 dropped:0 overruns:0 frame:0
TX packets:69974 errors:0 dropped:0 overruns:0 carrier:0
collisions:0 txqueuelen:1000
RX bytes:52493825 (52.4 MB) TX bytes:10240243 (10.2 MB)
Interrupt:40 Base address:0xa000
lo Link encap:Local Loopback
inet addr:127.0.0.1 Mask:255.0.0.0
inet6 addr: ::1/128 Scope:Host
UP LOOPBACK RUNNING MTU:16436 Metric:1
RX packets:1440 errors:0 dropped:0 overruns:0 frame:0
TX packets:1440 errors:0 dropped:0 overruns:0 carrier:0
collisions:0 txqueuelen:0
RX bytes:127377 (127.3 KB) TX bytes:127377 (127.3 KB)
2. If you want to find the uptime of all the hosts which are exists in our host file. So you can do this via this command:
pssh -O StrictHostKeyChecking=no -h hostfile -l admin -A -i "uptime" [1] 12:02:01 [SUCCESS] 172.16.9.0
12:02:01 up 2:48, 0 users, load average: 0.63, 0.50, 0.45
[2] 12:02:01 [SUCCESS] 172.16.9.1
12:02:01 up 2:07, 0 users, load average: 1.30, 0.97, 0.83
You can also see the man page of pssh for find out all options it have.
pssh --help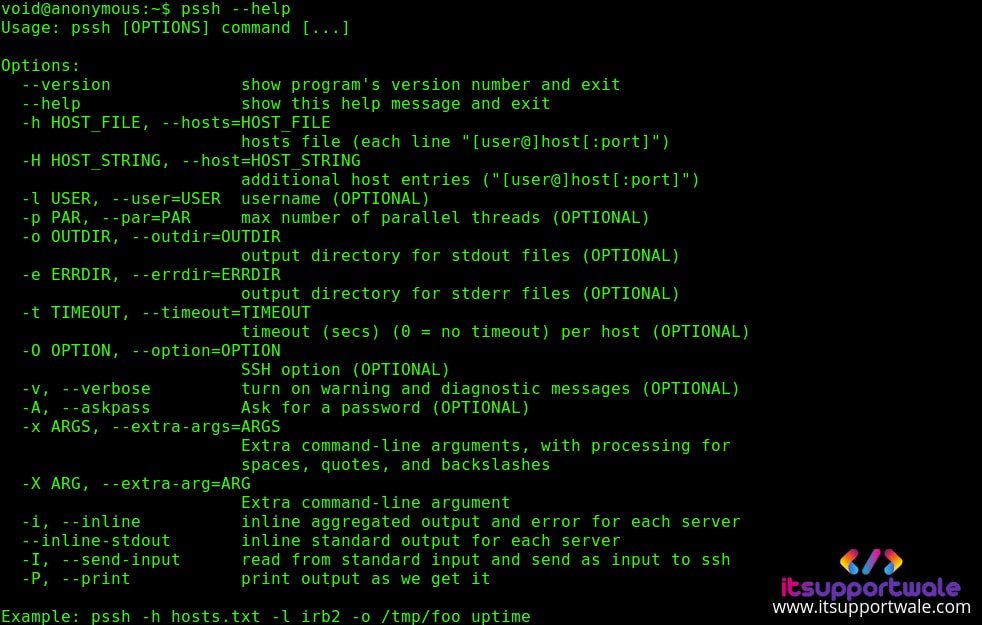
Summary
In this article we covered all the intial steps to use the pssh command. This is a very useful tool for all system administrators. Well thats it for now you can share your thoughts in the comment section. Happy Learning ..!!
Also Learn : “How to upgrade to python 3.7 on Ubuntu 18.10”